
Tips to Make Cork Adhere: Methods for a DIYer
If you’re the type of person who’s always looking for ways to improve their household, then this blog post is perfect for you. It contains a number of tips and tricks to make cork adhere better. This will be helpful if you use wine bottle corks as stoppers or want to ensure that your wine doesn’t spoil. The best part is that it only takes a few minutes and requires basic tools! If you’re interested in learning more about these tips, keep reading below! What are some other ways that I can make my home life easier?
Make cork stick to the walls
It can be really frustrating when you have a cork that doesn’t want to adhere. Here are some tips for making it stick to the bottle.
- Make sure you’re using the right size of cork – too small or too large, and it won’t work.
- Coat the top of the inside part of the cork with glue (make sure not to get any on your fingers while doing this).
- Push firmly down onto bottle until adhesive is sealed (you should hear a “pop”).
- Wait at least an hour before removing if possible. If not, grab your dish soap-filled sponge and gently scrub off excess adhesive residue around edges to avoid damaging surfaces like wood furniture, marble countertops.
How to glue cork and cork together
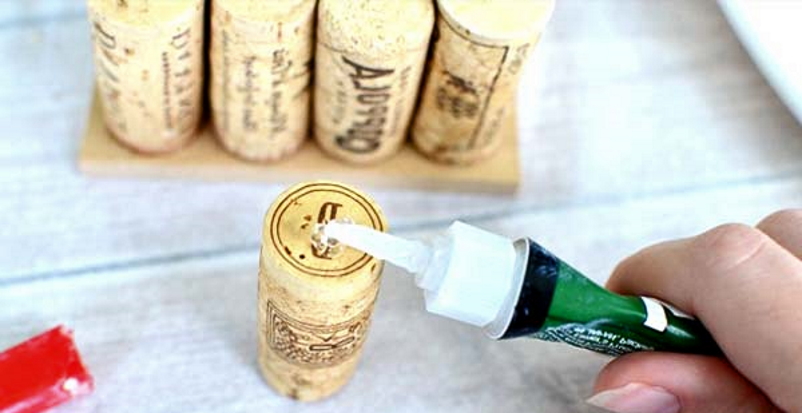
Ever had a cork pop off the bottom of your wine bottle? Or worse, have it fall into your glass? You might be wondering how to glue a cork back on. It’s actually not as hard as you think. There are two types of adhesives that work for this task: hot melt and epoxy glue for cork. Hot melt is quicker but more expensive, while epoxy takes a little longer to dry but costs less in the long run. Let’s look at both methods! Here are some quick tips on how to make sure you’re gluing corks properly: Clean the top and bottom of the cork with rubbing alcohol before applying adhesive; use enough adhesive to cover about an inch of surface area around the cork.
Glueing cork to cork is a surprisingly simple process, but it does require patience and care. The first step is to make sure the surfaces are clean. Any dirt or dust will interfere with adhesion. Once you have made sure the surface of the materials are clean, use an epoxy adhesive that works on wood and metal surfaces. Apply a generous amount of glue in a very thin line across one side of each piece of material before sticking them together so there’s no space between them. Press firmly for about 15 seconds before moving onto another section. If you’re doing this project on your own, be careful not to get any glue where it doesn’t belong because it won’t come off easily.